A New project is created by clicking ![]() “Add project” in the left vertical menu from the customer main page.
“Add project” in the left vertical menu from the customer main page.
After the project has been added, to edit an existing project, you click ![]() “Edit project” in the left vertical menu when you are inside a project.
“Edit project” in the left vertical menu when you are inside a project.
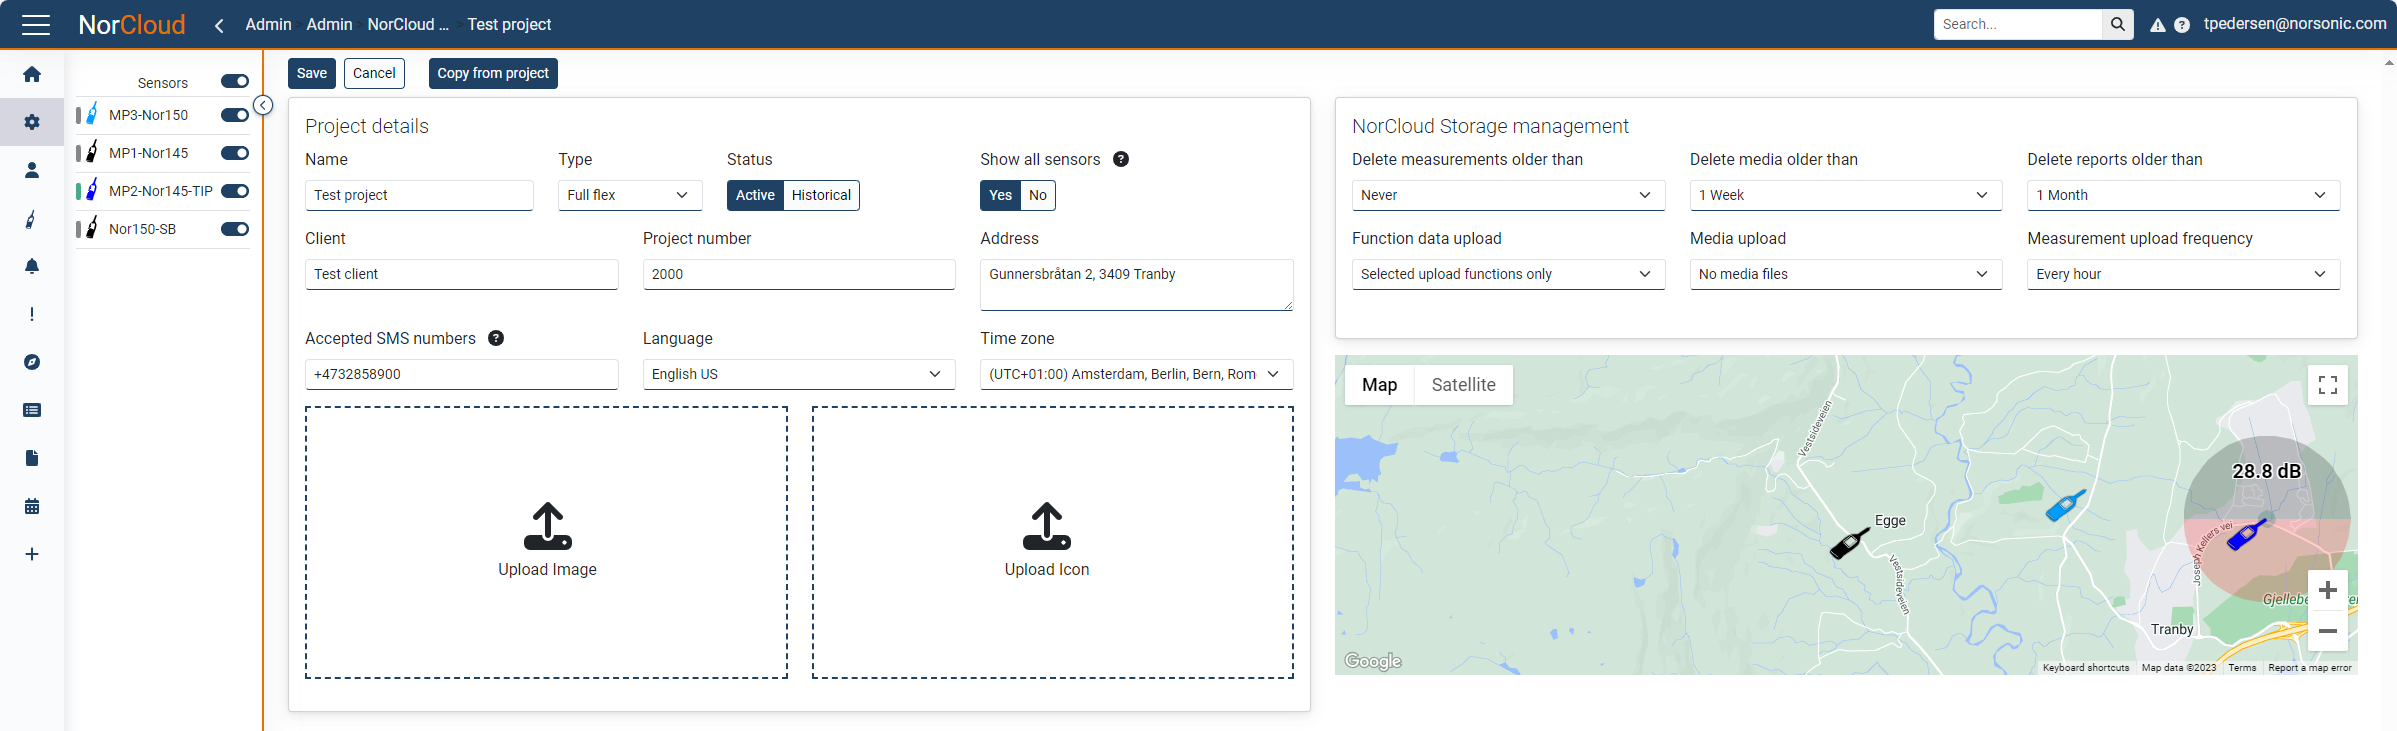
In the Project settings menu you can edit Project details and NorCloud Storage management.
Project details
Field Name |
Optional / Required |
Data in field |
Information |
|---|---|---|---|
Name |
Required |
Name of the Project |
|
Type |
Required |
Full flex, one minute, one second, milli second |
The type of project sets the limit to what resolution the project could run in. It is used to ensure limited/correct credit point cost for the project. |
Status |
Required |
Active / Historical |
Default is “Active”. "Historical" should be used when a project is ended, or to define an idle instrument collection project. |
Show all sensors |
Required |
Yes / No |
If this is set to Yes, then all sensors that has been in the project earlier and set to historical (disabled) will be shown in the same list. If this is set to No, then only the sensors that are active (enabled) are shown in the list and the tabs active/historical will appear above the sensor list. Click on the historical tab to show the historical (disabled) sensors. |
Client |
|
Name of the Client |
The Client is not necessary the same as the customer. I.e. the project could be a rental project for another customer called the client. |
Project number |
|
Name or number of the Project |
|
Address |
|
The address of the Project |
It's possible to click and drag bottom right corner of the textbox to resize it. |
Accepted SMS numbers |
Optional |
Multiple numbers allowed separated with comma "," or space |
Cell phone number to be used for sending SMS commands to instruments connected via cellular modem. Multiple numbers allowed separated with comma "," or space. It is recommended to include country code as a part of the phone number, e.g. +47xxxxxxxx and the number must accept incoming SMS. Once you click save, if the SMS number is valid and the instrument is properly set up with a modem, you will receive an SMS with a welcome message "Sms available from <phone number>". |
Language |
Required |
English, Deutsch, Français, Español, Norsk |
NorCloud language applicable for the project on the web (default English). |
Time Zone |
Required |
Different time zones compared to Coordinated Universal Time (UTC) |
Time zone of the project location. Please note that NorCloud will override time settings in instrument. |
Upload Image / Icon |
Optional |
Picture / Icon files of for example the installation |
Click on the respective center icon to upload Image or Icon. Supported image formats are jpg, gif and png. |
Storage management
The storage management settings applies only to what's uploaded, normally automatically from the sensor, and stored in NorCloud. If you want to change storage settings for the sensor, please go to the sensor settings.
Here you define the auto clean function of this project's data stored on NorCloud, all sensors.
Important: The auto-clean operation cannot be undone!
Field name |
Data in field |
Information |
|---|---|---|
Delete measurements older than |
Never, Years, Months, Weeks, Days |
Deletes the measurement files in NorCloud (not the instrument) when reaching the given time. |
Delete media older than |
Never, Years, Months, Weeks, Days |
Deletes the media files, i.e., pictures and recordings from NorCloud (not the instrument) when reaching the given time. |
Delete reports older than |
Never, Years, Months, Weeks, Days |
Deletes the reports created from NorCloud when reaching the given time. Reports can be recreated if measurement files still exists. No reports are made on the instrument. |
Function data upload |
Selected upload functions only, NoData |
Selected upload functions only means that what you have set up under sound setup is uploaded to NorCloud. If NoData is chosen, NorCloud will not receive and store any measurement data. It will only function as an interface for controlling the instrument. More info here. |
Media upload |
No media files, Audio recordings only, Pictures only, All media files |
Media files are stored on the instrument and will be automatically be cleaned up if instrument does not change project. Having other settings than No media files will ensure that these types of files are uploaded and stored in NorCloud. Use this if you want longer audio recordings (events) stored on the instrument, choose No media files. This requires manual uploading to NorCloud if you want part of the recordings stored there. |
Measurement upload frequency |
Every hour, Continuous |
This is the frequency for which measurement data is uploaded from the instrument to NorCloud. |
Map settings
Here you can alter the map position and the sensor placements.
To place a sensor on the map, simply drag the sensor from the sensor list onto the map, you might have to open the left menu to show sensors by clicking the ![]() icon top left. If the sensor is already in the map, you may move it again by clicking and dragging directly on the instrument icon inside the map.
icon top left. If the sensor is already in the map, you may move it again by clicking and dragging directly on the instrument icon inside the map.
Click on the sensor inside the map to get a menu:
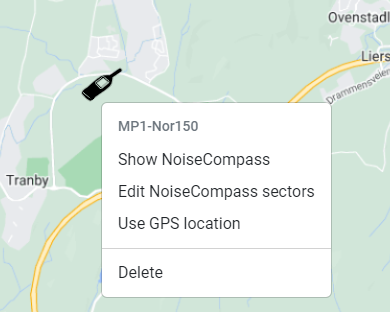
•Show NoiseCompass
•Edit NoiseCompass sectors
•Use GPS location, this choice is only available if GPS is enabled on the sensor, a measurement has been saved and a GPS position has been registered. To update the position to the latest, start and stop a measurement on the sensor instrument control (requires administrator access). To test GPS signals on a Nor145/150 sensor, go back to the main measurement window on the physical instrument and press the INFO button.
•Delete, this is only available when editing the project. It removes the icon from the map. The icon can be dragged again from the sensor list into the map.
Copy from project
Use this button to copy settings from another project. More details here.
Click “Save” to store the input. “Cancel” will exit without saving.