Microphone check is performed every night at 0300 if it is enabled in NorCloud. It can be enabled and setup when editing a sensor.
Some Theory
The microphone check (or SysCheck) is a verification of the cartridge capacitance. The cartridge capacitance varies from one microphone to another, similar as the microphone sensitivity. The sound level meter Nor145 or Nor150 sends a fixed signal at 1000Hz to the microphone and compare the measured value against a reference value stored in the instrument. The reference value is typically between 89 to 92 dB. The important factor is that this value should not deviate more than the allowed tolerance level. The tolerance level can be set between 0,5 to 5 dB. Recommended is 0,7dB
How is it implemented in NorCloud and Nor145/150
The calibration procedure is committed each night at 0200. Calibration frequency is 1000Hz. Measured parameters are LAeq and LAFmax, global only.
The procedure takes less than one minute and will appear as a gap in the continuous L/t data. It is a separate file and will not be a part of the overall measurement.
How to set up microphone check at the instrument
The procedure for using the microphone check on the instrument is as follows:
1.Perform a normal calibration of the entire instrument by use of an external acoustical calibrator to establish a "reference level".
2.Remove the calibrator from the instrument.
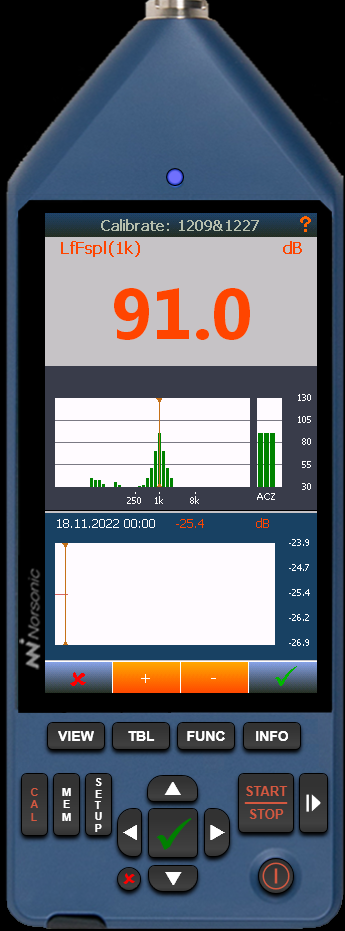
3.On the instrument, press CAL > Mic. Check to open the mic. check menu. Place the cursor on the 1 kHz bar and read the level. The level will depend on the actual previous sensitivity calibration as well as the individual preamplifier and microphone in use. Do not adjust the sensitivity as it should already be set in number 1 above.

Instrument microphone check
4.Read the level displayed, in this example it's 91,0 dB.
How to set up microphone check in NorCloud
The Reference level and Tolerance is set from the Edit Sensor menu. You must enable Transducer check to get access to these two settings:

Click the microphone check in the sound sensor main page on the left side to view the status log of the microphone checks:

List of microphone checks
Explanation of the microphone check procedure
Procedure starts
•Measure background noise. 15 sec measurement. Parameter LAeq 15 sec and LAFmax
•Turn on mic check
•Wait 15 seconds
•Measure mic check level. 15 sec measurement. Parameter LAeq 15 sec and LAFmax
•Turn off mic check signal
•Wait 5 sec
•Start normal measurement
Procedure finish
The Validation of the microphone check is as follow;
1.If ref. level – LAeq background < 12 dB then validator is false due to too high background noise which may result in a too high measured value.
2.If LAFmax mic check -LAeq mic check is > 1 dB then validator is false due to impulsive noise during the calibration process which may result in a too high calibration level.
3.If validator is true the following is checked;
4.If LAeq mic check – reflevel > +- tolerance then mic check is false.
5.If LAeq mic check – reflevel < +- tolerance then mic check is true / passed.
A system alarm may be generated if the microphone check fails. This is enabled in the Systems Alarm menu.
The Mic Check feature requires instrument application version 3.0.2107 or newer.